Detailed Setup Guide
This guide walks you through essential first-time setup to get FBSAT59 working with your equipment.
Initial Setup Checklist
You must configure these before satellite tracking will work:
- Location (QTH) — Your latitude/longitude for accurate pass predictions
- Radio (optional) — If you have an amateur radio
- SDR (optional) — If you have a software-defined radio
Everything else is optional and can be configured later.
Step 1: Set Your Location (CRITICAL)
Accurate satellite pass predictions depend on knowing your location.
Option A: Latitude / Longitude (Recommended)
- Open Settings (or View menu → Location)
- Select Latitude / Longitude (default)
- Enter your coordinates in decimal degrees:
Example (Tokyo, Japan):
- Latitude: 35.6762
- Longitude: 139.6503
- Elevation: 35 meters
- Click [OK]
Option B: Maidenhead Grid Locator
If you know your QTH grid locator:
- Select Maidenhead Grid Locator
- Enter 6-character grid (e.g.,
PM95aq) - Click [OK]
Find your grid: - https://www.gridlocator.com/ (web) - Apps: "QTH Locator" on iOS/Android
Option C: GPS (Automatic)
If your computer has GPS or gpsd daemon:
- Settings → Location → GPS
- FBSAT59 automatically detects satellites
- Updates your position every 10 seconds
Option D: Browser Geolocation (Phone)
- Open Web UI on your phone (
http://192.168.x.x:8080) - Grant location permission when prompted
- Position stored on desktop
Step 2: (Optional) Connect Your Radio
Requirements
- Amateur radio (700+ models supported via Hamlib)
- USB or serial cable
- Driver installed (if needed)
Setup Process
-
Connect radio via USB
-
Open Settings → Rig Settings
-
Select radio model from dropdown:
- Yaesu FT-991A
- Icom IC-9700
- Kenwood TS-2000
-
(or search for yours)
-
Connection method auto-detects:
- Direct (USB) — /dev/ttyUSB0 (Linux), COM3 (Windows)
-
Network (TCP) — For networked radios
-
Click [Connect]
-
Status bar shows ✅ RIG: 1 when connected
Testing Radio Connection
- Select a satellite from the left list
- Open Radio Control tab
- Frequencies should update when you select a transponder
- Try clicking [PTT ON] — your radio should transmit
Troubleshooting
"Serial port not found"
- Windows: Install FTDI drivers → https://ftdichip.com/drivers/
- macOS: Restart FBSAT59 after connecting radio
- Linux: Check lsusb output for your radio
"Connection refused" - Some radios require baud rate change - Try different baud rates in Settings - Check radio manual for CAT configuration
Step 3: (Optional) Connect Your SDR
If you have a software-defined radio (RTL-SDR, HackRF, etc.):
Supported Devices
- RTL-SDR (Realtek USB)
- HackRF One / HackRF Jawbreaker
- USRP (if SoapySDR support available)
- PlutoSDR / LimeSDR
Setup
-
Plug in SDR via USB
-
Settings → SDR Settings
-
Select device from dropdown
-
Configure:
- Sampling rate (1–2.4 MSPS typical)
- RF gain (depends on antenna)
- PPM correction (frequency calibration)
-
Antenna port (if selectable)
-
Click [Connect]
-
Status bar shows ✅ SDR: Ready
First SDR Session
- Open SDR Control tab
- Adjust gain slider (watch waterfall)
- Select a satellite
- Waterfall should show signal at downlink frequency
- Listen for satellite beacon (audio output)
Step 4: Location-Specific Adjustments
Magnetic Declination (Rotator Only)
If you have a rotator pointing your antenna:
- Settings → Rotator
- Enter magnetic declination for your location
Find your declination: - https://www.magnetic-declination.com/
This corrects compass readings so rotator points correctly.
Elevation Mask
Prevent tracking satellites below a certain elevation (to avoid QRM from trees, buildings):
- Settings → Tracking
- Set minimum elevation: 10° (default) or higher
- Satellites below this angle won't appear in pass predictions
Local Time vs UTC
Choose display format:
- View menu → Time Zone
- UTC — For propagation prediction & logs
- Local — For convenient pass times
Step 5: Testing Your Setup
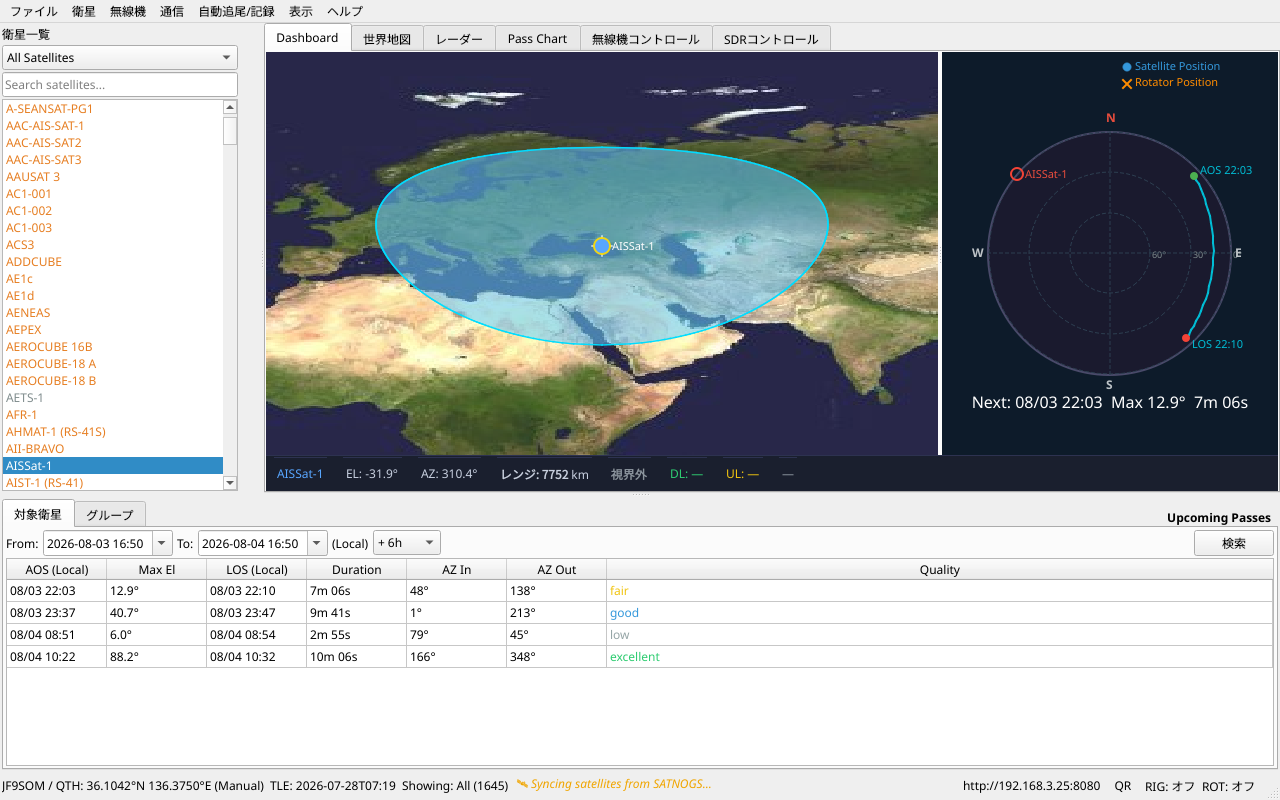
Test 1: View a Satellite Pass
- Open Passes tab
- Select any satellite
- Choose next 7 days
- Should see upcoming passes listed
Example pass data: - AOS (rise time), LOS (set time) - Maximum elevation - Pass duration - Quality rating (color-coded)
Test 2: Real-Time Tracking
- Wait for a satellite pass
- Open Dashboard tab
- Watch satellite dot move across the map
- Elevation/azimuth should update every second
- You should hear the satellite signal if tuned correctly
Test 3: Radio Doppler
- During a satellite pass, open Radio Control
- Select a transponder
- Watch downlink frequency change (Doppler correction)
- Should shift UP as satellite approaches, DOWN as it recedes
Common Setup Mistakes
❌ Wrong Location
Symptom: Pass predictions are 30+ minutes off
Fix: - Double-check your coordinates (use GPS or web tool) - Remember: negative longitude for West, negative latitude for South - Example: New York is 40.7128°N, -74.0060°W (note the minus sign)
❌ Old TLE Data
Symptom: Satellite appears in wrong part of sky
Fix: - Help → TLE Status (check data age) - Satellite menu → Fetch TLE Data - Should be updated at least daily
❌ Radio Not Responding to Frequency Changes
Symptom: Radio frequency doesn't update when selecting transponder
Fix: - Ensure radio is in USB/LSB or compatible mode (not FM) - Check radio CAT/CI-V is enabled - Verify baud rate matches radio settings - Try different port
❌ Doppler Shift Seems Wrong
Symptom: Frequency correction is too much or too little
Fix: - Your location might be slightly off (a few km is normal) - TLE data should be less than 24 hours old - Test with known satellite (ISS is best reference)
Advanced Setup (Optional)
Space-Track.org Credentials
For backup TLE sources (optional):
- Create account at https://space-track.org/
- Settings → Data Sync → Space-Track
- Enter username/password
- FBSAT59 will use Space-Track as backup source
Dual Radio Setup (Rig 1 + Rig 2)
For split-frequency operation:
- Settings → Rig 1 Settings (first radio)
- Settings → Rig 2 Settings (second radio)
- Both appear in Radio Control tab
- Uplink on Rig 1, Downlink on Rig 2 for example
Remote SDR (SoapyRemote)
Access SDR on another machine over network:
- Run
SoapySDRServeron remote machine - Settings → SDR → Remote
- Enter remote IP and port
You're All Set! 🎉
Next steps:
- Radio Control — Advanced radio features
- Communications — APRS, FT4, Q65
- Autotrack — Automatic pass tracking
- Wait for a satellite pass — Your first real-world test!
Getting Help
- In-app: Help menu has built-in guides
- FAQ: Troubleshooting Guide
- GitHub Issues: https://github.com/jf9som/fbsat59/issues
- Discord/Forum: (link to community)
Don't give up if something doesn't work immediately — Most issues are resolved with one small setting change!